Gimp 2.8
Содержание:
- Options
- A simple example
- Splash Images
- [править] Pros&Cons или курс молодого холиварщика
- Updated user interface and initial HiDPI support
- Возможности редактора Gimp
- GIMP for Windows
- GIMP for macOS
- Advanced usage
- More use for CIE LAB and CIE LCH
- Step 1
- Adding a Mask to a Layer
- Files
- Digital painting improvements
- Adding colors
Options
GIMP accepts the following options:
- -h, —help
- Show GIMP command-line options.
- —help-all
- Show all command-line options.
- —help-gtk
- Show GTK+ command-line options.
- —help-gegl
- Show GEGL command-line options.
- -v, —version
- Output version information and exit. When combined with the —verbose option, version information about libraries used by GIMP is shown as well.
- —license
- Output license information and exit.
- —verbose
- Be verbose and create information on standard output.
- -n, —new-instance
- Do not attempt to reuse an already running GIMP instance. Always start a new one.
- -a, —as-new
- Open filenames passed on the command-line as new images, don’t set the filename on them.
- -i, —no-interface
- Run without a user interface.
- -d, —no-data
- Do not load patterns, gradients, palettes, or brushes. Often useful in non-interactive situations where startup time is to be minimized.
- -f, —no-fonts
- Do not load any fonts. No text functionality will be available if this option is used.
- —display _display_
- Use the designated X display.
- -s, —no-splash
- Do not show the splash screen.
- —no-shm
- Do not use shared memory between GIMP and its plug-ins. Instead of using shared memory, GIMP will send the data via pipe. This will result in slower performance than using shared memory.
- —no-cpu-accel
- Do not use CPU accelerations such as MMX or SSE even if GIMP detects that your CPU provides this functionality.
- —session <name>
- Use a different sessionrc for this GIMP session. The given session name is appended to the default sessionrc filename.
- -g, —gimprc <gimprc>
- Use an alternative gimprc instead of the default one. Useful in cases where plug-in paths or machine specs may be different.
- —system-gimprc <gimprc>
- Use an alternate system gimprc file.
- —dump-gimprc
- Output a gimprc file with default settings.
- —debug-handlers
- Enable debugging signal handlers.
- -c, —console-messages
- Do not popup dialog boxes on errors or warnings. Print the messages on the console instead.
- —stack-trace-mode {never|query|always}
- If a stack-trace should be generated in case of fatal signals.
- —pdb-compat-mode {off|on|warn}
- If the PDB should provide aliases for deprecated functions.
- —batch-interpreter <procedure>
- Specifies the procedure to use to process batch events. The default is to let Script-Fu evaluate the commands.
- -b, —batch <command>
- Execute <command> non-interactively. This option may appear multiple times. The <command> is passed to the batch interpreter. When <command> is — the commands are read from standard input.
A simple example
(define (simple-unsharp-mask filename
                              radius
                  amount
                  threshold)
   (let* ((image (car (gimp-file-load RUN-NONINTERACTIVE filename filename)))
          (drawable (car (gimp-image-get-active-layer image))))
     (plug-in-unsharp-mask RUN-NONINTERACTIVE
                       image drawable radius amount threshold)
     (gimp-file-save RUN-NONINTERACTIVE image drawable filename filename)
     (gimp-image-delete image)))
This simple script takes a filename and some numeric parameters. It opens the respective file, applies the Unsharp Mask filter and saves the image again (be careful, for the sake of simplicity this script overwrites the original image). It does all this w/o any user interaction, so we can run it without any user interface. In order to do that, save the script with the .scm extension in the ~/.gimp-2.4/scripts directory. Then run it like this:
gimp -i -b '(simple-unsharp-mask "foo.png" 5.0 0.5 0)' -b '(gimp-quit 0)'
There is a catch here: Some plugins or Script-Fu scripts create new layers and then flatten the image again. This changes the drawable ID. If this is the case insert the following line to get the current drawable ID just before saving the image:
(set! drawable (car (gimp-image-get-active-layer image)))
Splash Images
GIMP comes with a default image for the splash screen but it allows system administrators and users to customize the splash screen by providing other images. The image to be used with the splash screen is chosen as follows:
-
GIMP tries to load a random splash screen from the directory $HOME/.gimp-2.6/splashes.
-
It then falls back to using $HOME/.gimp-2.6/gimp-splash.png.
-
If the user didn’t install any custom splash images, a random image is picked from /usr/share/gimp/2.0/splashes.
-
As a last resort, GIMP uses the default splash image located at /usr/share/gimp/2.0/images/gimp-splash.png.
[править] Pros&Cons или курс молодого холиварщика
| I see what you did there.Информация в данной статье приведена по состоянию на неизвестно когда. Возможно, она уже безнадёжно устарела и заинтересует только слоупоков. |
Он же, в естественной среде обитания
- Мало инструментов класса «сделать хорошо» («умные» штампики, хилинг браш и прочая). Впрочем, число подобных «фишек» растёт с каждым новым релизом.
- Отсутствие инструмента History Brush. Очень удобная штука, но не все умеют его использовать, некоторые вообще не понимают, зачем он нужен.
- Отсутствие корректирующих слоёв (хотя back-end уже есть). Как и в случае с History Brush не смертельно, но при должном умении в работе полезно.
- Большие системные требования (если работать с многогигабайтными изображениями).
- Меньшая скорость загрузки (разве что если сравнивать с ФШ 5.5).
- Кавайный логотип.
- GIMP можно запускать в консоли.
- Скриптуется на scheme (с некоторых пор для неосиляторов прикрутили Python).
- Пугающе оригинальный дизайн пользовательского интерфеса, который хаотично расположен между иконками рабочего стола, что создает большой риск запустить ненужную программу, или перепутать с окном другого приложения. С версии 2.8 есть однооконный режим.
- Топорные, для адептов ФШ, но вполне достаточные средства редактирования. Полное отсутствие понятия о векторах, как минимум до того момента, пока не прикрутят интерфейс к функционалу GEGL.
- В отличие от полностью интерактивной среды ФШ, позволяющей визуально корректировать результат, среда гимпа мертвая.
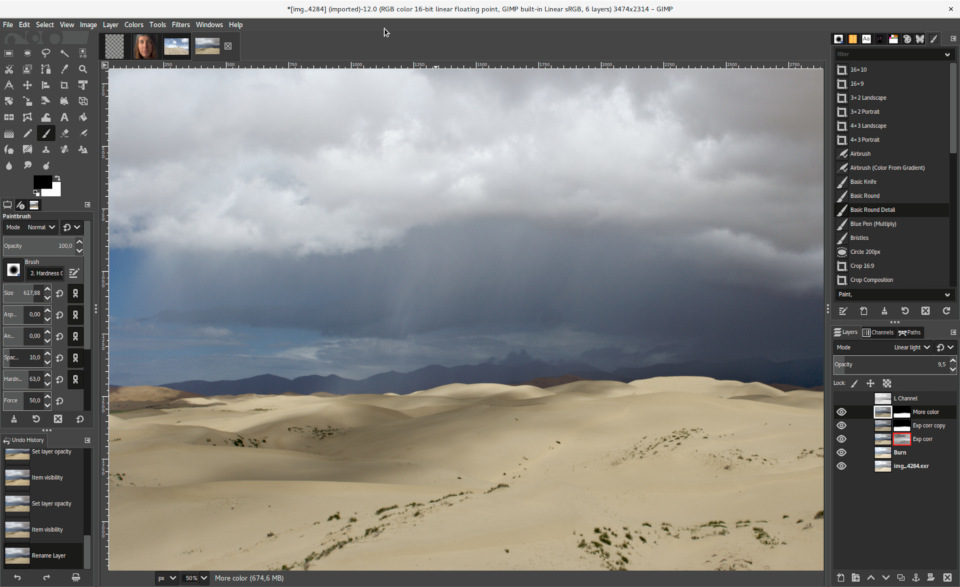
Updated user interface and initial HiDPI support
One thing immediately noticeable about GIMP 2.10 is the new dark theme and
symbolic icons enabled by default. This is meant to somewhat dim the environment
and shift the focus towards content.
There are now 4 user interface themes available in GIMP: Dark (default), Gray,
Light, and System. Icons are now separate from themes, and we maintain both
color and symbolic icons, so you can configure GIMP to have System theme with
color icons if you prefer the old look.
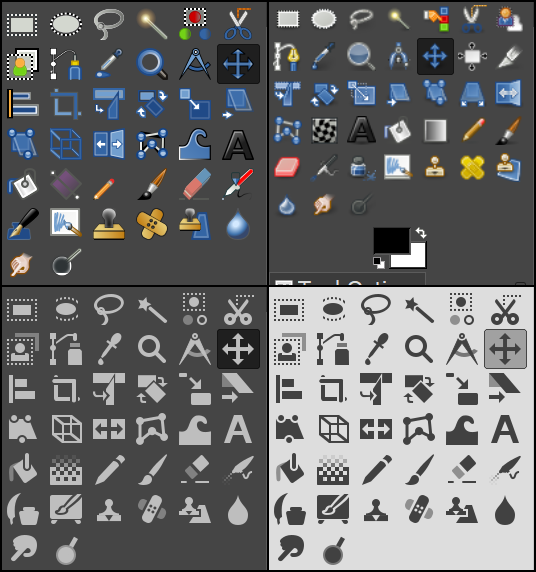
Color, Legacy, and Symbolic icons
Moreover, icons are available in four sizes now, so that GIMP would look better
on HiDPI displays. GIMP will do its best to detect which size to use, but you
can manually override that selection in Edit > Preferences > Interface >
Icon Themes.

Icons in various sizes to adapt for HiDPI displays.
Contributors: Benoit Touchette, Ville Pätsi, Aryeom Han, Jehan Pagès,
Alexandre Prokoudine…
Возможности редактора Gimp
Графический редактор Gimp позволяет выполнять широкий спектр операций с различными изображениями. Он поддерживает большое количество форматов, имеет множество предустановленных фильтров, кистей и шаблонов. Если вас не устраивает изначальный функционал, его можно расширить за счёт дополнительных модулей. Итак, что же умеет программа?
- Создание и продвинутая обработка графических файлов, фотографий, логотипов, рисунков. Можно менять размер, редактировать цвет, соединить несколько фото в одно, настраивать уровень яркости, контрастности, цветового баланса, искажений, преобразовывать картинки из одного формата в другой.
- Поддержка родного формата XCF, а также JPG, JPEG, GIF, TIFF, PNM, MPEG, PNG, TGA, TIF, PS, XPM, BMP, SGI, PDF, ICO, PCX и множества других. И также предоставляется ограниченная поддержка PSD — оригинального формата Photoshop.
- Рисование. Для создания полноценных рисунков доступен полный набор рабочих инструментов, включающих карандаши, кисти, штампы и другие. Каждый элемент можно тонко настроить, изменить толщину и форму линий, а также прозрачность.
- Создание многослойных проектов. Каждый элемент может наноситься в виде отдельного слоя, который затем в случае необходимости очень легко удалить или подкорректировать. А также доступна полная настройка альфа-канала.
- Полный набор инструментов для преобразования и трансформации: наклон, масштаб, поворот, вращение, отражение.
- Выделение фрагмента изображения. Доступны такие инструменты выделения, как фрагмент свободной формы, эллипс, прямоугольник, а также интеллектуальное выделение.
- Поддержка сканеров и графических планшетов.
- Большое количество встроенных фильтров, возможность как поштучной, так и пакетной обработки файлов.
- История. Все ваши действия хранятся в разделе «История», благодаря чему вы сможете отслеживать все выполненные изменения.
- Анимация. Обработка анимационных файлов формата MNG. Каждый кадр обрабатывается как отдельный слой.
- Многоязычное меню, включая качественный перевод на русский и украинский языки.
- Детальная настройка интерфейса, возможность работать в классическом многооконном меню, так и в более привычном для новичков однооконном.
- Интеграция внешних инструментов, разработанных специально для редактора Gimp.
- Автоматизация ваших операций за счёт скриптов, написанных на языках Perl, Python и Script-Fu.
GIMP for Windows
Download GIMP 2.10.22
via BitTorrent
Download GIMP 2.10.22
directly
The download links above will attempt to download GIMP from one of our trusted mirror servers.
If the mirrors do not work or you would rather download directly from our server, you can get the direct download here.
Supported OS: Windows 7 or over
These links download the official GIMP installer for Windows (~200 MB).
The installer contains both 32-bit and 64-bit versions of GIMP, and will automatically use the appropriate one.
BitTorrent is a peer-to-peer file sharing system. It works by downloading GIMP from a distributed network of BitTorrent users, and may improve download speed dramatically.
Choosing this option will download the torrent file for the GIMP installer.
You may need to install a torrent client to make use of this file. Learn more…
Hash Sum
The SHA256 hash sum for is:
f7851c348584ce432dfd8e69b74a168c7dec33ebfddc29c96ad2d6b83aded083
Check it on
VirusTotal:
Older Downloads
- Previous v2.10 installers for Windows can be found here: download.gimp.org.
- Previous v2.8 installers for Windows can be found here: download.gimp.org.
GIMP User Manual
These links download language-specific Windows installers for GIMP’s local help.
By default, they will place the help files with your GIMP installation.
Note: GIMP uses online help by default. If you want to use this local help offline, you will need to change GIMP’s help settings.
- In GIMP, select > >
- For «User manual», select «Use a locally installed copy»
- Under «Help Browser», you can choose between your system’s web browser and GIMP’s help browser plugin (if available).
See the for more settings.
GIMP for macOS
Note: the currently available package provides GIMP 2.10.14 and has not yet updated to the latest version, GIMP 2.10.22. We’re working on that, please check back later.
Download GIMP 2.10.14
via BitTorrent
Download GIMP 2.10.14
directly
The download links above will attempt to download GIMP from one of our trusted mirror servers.
If the mirrors do not work or you would rather download directly from our server, you can get the direct download here.
Supported OS: macOS 10.9 Mavericks or over
Since the 2.8.2 version, GIMP runs on OSX natively. No X11 environment is required.
Native build
The official GIMP 2.10 DMG installer (linked above) is a stock GIMP build without any add-ons. Just open the downloaded DMG and drag and drop GIMP into your «Applications» folder.
The SHA256 hash sum for is:
52654d85f894834f6c134c724beff3eddf212a1bda317299314322cfeff97e52
Check it on
VirusTotal:
Macports
An easy way to compile and install GIMP and other great Free software on your Mac is by using Macports. The installer allows you to choose from a large directory of packages. To install gimp using Macports, you simply do once you have Macports installed.
Last we checked, the GIMP
port file pointed to the current stable release
and we have reports from people who’ve built GIMP
successfully this way.
Download Macports
Homebrew
Homebrew is similar to Macports and provides packages (aka formulas) to install, either by compiling them from source or by using pre-made binaries. There are indications that there is now a formula for GIMP, installable with: .
Download Homebrew
NOTE! Please be aware that it was announced recently that Homebrew is using analytics.
To turn this off in homebrew then run:
You can read more about this on Brew Analytics.
Fink
Fink is a package repository that offer mostly precompiled binaries. It provides the apt-get command known to e.g. Debian and Ubuntu users, and installing GIMP is as easy as once you have installed the Fink installer.
If there’s no binary package, then will compile GIMP from source.
Disclaimer: we haven’t been able to determine if it is
possible to install or build recent GIMP from Fink.
Last we checked, GIMP 2.6.12 appears to be the most recent GIMP package that is offered there.
Advanced usage
Jimp supports advanced colour manipulation using a single method as follows:
image.color({ apply'hue', params-90},{ apply'lighten', params50},{ apply'xor', params'#06D'});
The method supports the following modifiers:
| Modifier | Description |
|---|---|
| lighten {amount} | |
| brighten {amount} | |
| darken {amount} | |
| desaturate {amount} | |
| saturate {amount} | |
| greyscale {amount} | |
| spin {degree} | |
| hue {degree} | Alias for spin |
| mix {color, amount} | Mixes colors by their RGB component values. Amount is opacity of overlaying color |
| tint {amount} | Same as applying mix with white color |
| shade {amount} | Same as applying mix with black color |
| xor {color} | Treats the two colors as bitfields and applies an XOR operation to the red, green, and blue components |
| red {amount} | Modify Red component by a given amount |
| green {amount} | Modify Green component by a given amount |
| blue {amount} | Modify Blue component by a given amount |
Implement emboss effect:
image.convolute(-2,-1,,-1,1,1,,1,2);
Jimp enables low-level manipulation of images in memory through the bitmap property of each Jimp object:
image.bitmap.data;image.bitmap.width;image.bitmap.height;
This data can be manipulated directly, but remember: garbage in, garbage out.
A helper method is available to scan a region of the bitmap:
image.scan(x, y, w, h, f);
Example usage:
image.scan(,,image.bitmap.width,image.bitmap.height,function(x,y,idx){var red =this.bitmap.dataidx +;var green =this.bitmap.dataidx +1;var blue =this.bitmap.dataidx +2;var alpha =this.bitmap.dataidx +3;});
If you need to do something with the image at the end of the scan:
image.scan(,,image.bitmap.width,image.bitmap.height,function(x,y,idx){if(x ==image.bitmap.width-1&& y ==image.bitmap.height-1){}});
It’s possible to make an iterator scan with a , if you want to the scan before it reaches the end, but note, that this iterator has a huge performance implication:
for(const{x,y,idx,image}ofimage.scanIterator(,,image.bitmap.width,image.bitmap.height)){}
A helper to locate a particular pixel within the raw bitmap buffer:
image.getPixelIndex(x, y);
One of the following may be optionally passed as a third parameter to indicate a strategy for x, y positions that are outside of boundaries of the image:
Jimp.EDGE_EXTEND=1;Jimp.EDGE_WRAP=2;Jimp.EDGE_CROP=3;
Alternatively, you can manipulate individual pixels using the following these functions:
image.getPixelColor(x, y);image.setPixelColor(hex, x, y);
Two static helper functions exist to convert RGBA values into single integer (hex) values:
Jimp.rgbaToInt(r, g, b, a);Jimp.intToRGBA(hex);
You can convert a css color (Hex, RGB, RGBA, HSL, HSLA, HSV, HSVA, Named) to its hexadecimal equivalent:
Jimp.cssColorToHex(cssColor);
If you want to begin with an empty Jimp image, you can call the Jimp constructor passing the width and height of the image to create and a Node-style callback:
newJimp(256,256,(err,image)=>{});
You can optionally set the pixel colour as follows:
newJimp(256,256,0xff0000ff,(err,image)=>{});
Or you can use a css color format:
newJimp(256,256,'#FF00FF',(err,image)=>{});
You can also initialize a new Jimp image with a raw image buffer:
newJimp({ data buffer, width1280, height768},(err,image)=>{});
This can be useful for interoperating with other image processing libraries. is expected to be four-channel (rgba) image data.
More use for CIE LAB and CIE LCH
With GIMP 2.10, we introduced a number of features that make use of CIE LAB and
CIE LCH color spaces:
- Color dialogs now have an LCH color selector you can use instead of HSV. The LCH
selector also displays out-of-gamut warning. - A new Hue-Chroma filter in the Colors menu works much like Hue-Saturation,
but operates in CIE LCH color space. - The Fuzzy Select and the Bucket Fill tools can now select colors by their
values in CIE L, C, and H channels. - Both the Color Picker and the Sample Points dialog now display pixel
values in CIE LAB and CIE LCH at your preference.
Contributors: Michael Natterer, Elle Stone, Ell…
Step 1
We’ll create a very simple web banner. Let’s start with a new image 468×60 px. Use white as the background color. Create new transparent layer. Select the whole image with Ctrl+A and fill it with black (Ctrl+,). Shrink the selection by 1 px () and delete the selection with Ctrl+K. We created a 1 px frame around out banner.
Now it’s time to put our logo or the main theme picture into the banner. I have prepared a masked-out flower you see on the picture on the left. I just pasted the flower below the border frame, used alpha to selection, created an empty layer below it and filled the selection with black using Ctrl+,. After that I blurred the shadow using Gaussian blur RLE and offset it by 2px to bottom right. I couldn’t resist adding the interlace effect using and a layer mask. In that layer mask i applied a b/w gradient, so that the left of the flower is not interlaced.
This part of the tutorial is not the key element, so feel free to experiment. Once you’re ready flatten the image using the .
Adding a Mask to a Layer
Layer masks need to be added to a layer before they can be used. The process for adding them is simple.
Layers dialog for the image.
For this example I will use a simple image with only two layers, as shown above. There is a base image at the bottom of the stack, and a single layer of teal over it. The teal layer is the active layer (look for the white border), and the one which we will add a layer mask to.
Right-Click on the layer you want to add a mask to (the “Teal” layer in my example), and the Context menu will show an option to Add Layer Mask…:
Add Layer Mask in the context menu.
You can also add a layer mask through the menus:
Layer → Mask → Add Layer Mask…
This will then bring up the “Add a Mask to the Layer” dialog with some options:
Add mask options dialog.
There are many options for initializing the Layer Mask. Notice that the first option is to set the entire mask to White, which will result in full opacity on the layer (no transparency from the mask). The option to initialize to Black shows that the mask will make the entire layer fully transparent.
For the purposes of this tutorial, we will let the mask initialize to White (full opacity). You should notice a change in your Layers dialog now that shows the layer mask thumbnail to the right of the layer it applies to (in this case the “Teal” layer):
Layers dialog with mask applied to Teal layer.
The layer mask has now been added to the “Teal” layer. It is also active (there is a white border around the thumbnail in the dialog, but is not visible due to the mask being white as well) and ready for modification.
Files
GIMP’s data files are stored in /usr/share/gimp/2.0, where ${datarootdir} is set on install, but is typically /usr/share. GIMP’s system-wide configuration files are stored in /etc/gimp/2.0, where ${prefix} is typically /usr.
Most GIMP configuration is read in from the user’s init file, $HOME/.gimp-2.6/gimprc. The system wide equivalent is in /etc/gimprc. The system wide file is parsed first and the user gimprc can override the system settings. /etc/gimprc_user is the default gimprc placed in users’ home directories the first time GIMP is run.
$HOME/.gimp-2.6/devicerc — holds settings for input devices together with the tool, colors, brush, pattern and gradient associated to that device.
$HOME/.gimp-2.6/gtkrc — users set of GIMP-specific GTK+ config settings. Options such as widget color and fonts sizes can be set here.
/etc/gimp/2.0/gtkrc — sytem wide default set of GIMP-specific GTK+ config settings.
$HOME/.gimp-2.6/menurc — user’s set of keybindings.
$HOME/.gimp-2.6/parasiterc — Stores all persistent GIMP parasites. This file will be rewritten every time you quit GIMP.
$HOME/.gimp-2.6/sessionrc — This file takes session-specific info (that is info, you want to keep between two GIMP sessions). You are not supposed to edit it manually, but of course you can do. This file will be entirely rewritten every time you quit GIMP. If this file isn’t found, defaults are used.
$HOME/.gimp-2.6/templaterc — Image templates are kept in this file. New images can conveniently created from these templates. If this file isn’t found, defaults are used.
/etc/gimp/2.0/unitrc — default user unit database. It contains the unit definitions for centimeters, meters, feet, yards, typographic points and typographic picas and is placed in users home directories the first time GIMP is ran. If this file isn’t found, defaults are used.
$HOME/.gimp-2.6/unitrc — This file contains your user unit database. You can modify this list with the unit editor. You are not supposed to edit it manually, but of course you can do. This file will be entirely rewritten every time you quit GIMP.
$HOME/.gimp-2.6/plug-ins — location of user installed plug-ins.
$HOME/.gimp-2.6/pluginrc — plug-in initialization values are stored here. This file is parsed on startup and regenerated if need be.
$HOME/.gimp-2.6/modules — location of user installed modules.
$HOME/.gimp-2.6/tmp — default location that GIMP uses as temporary space.
/usr/share/gimp/2.0/brushes — system wide brush files.
$HOME/.gimp-2.6/brushes — user created and installed brush files. These files are in the .gbr, .gih or .vbr file formats.
$HOME/.gimp-2.6/curves — Curve profiles and presets as saved from the Curves tool.
$HOME/.gimp-2.6/gimpressionist — Presets and user created brushes and papers are stored here.
$HOME/.gimp-2.6/levels — Level profiles and presets as saved from the Levels tool.
/usr/share/gimp/2.0/palettes — the system wide palette files.
$HOME/.gimp-2.6/palettes — user created and modified palette files. This files are in the .gpl format.
/usr/share/gimp/2.0/patterns — basic set of patterns for use in GIMP.
$HOME/.gimp-2.6/patterns — user created and installed gimp pattern files. This files are in the .pat format.
/usr/share/gimp/2.0/gradients — standard system wide set of gradient files.
$HOME/.gimp-2.6/gradients — user created and installed gradient files.
/usr/share/gimp/2.0/scripts — system wide directory of scripts used in Script-Fu and other scripting extensions.
$HOME/.gimp-2.6/scripts — user created and installed scripts.
/usr/share/gimp/2.0/gflares — system wide directory used by the gflare plug-in.
$HOME/.gimp-2.6/gflares — user created and installed gflare files.
/usr/share/gimp/2.0/gfig — system wide directory used by the gfig plug-in.
$HOME/.gimp-2.6/gfig — user created and installed gfig files.
/usr/share/gimp/2.0/images/gimp-splash.png — the default image used for the GIMP splash screen.
/usr/share/gimp/2.0/images/gimp-logo.png — image used in the GIMP about dialog.
/usr/share/gimp/2.0/tips/gimp-tips.xml — tips as displayed in the “Tip of the Day” dialog box.
Digital painting improvements
GIMP 2.10 ships with a number of improvements requested by digital painters. One
of the most interesting new additions here is the MyPaint Brush tool that
first appeared in the GIMP-Painter fork.
The Smudge tool got updates specifically targeted in painting use case. The
new No erase effect option prevents the tools from changing alpha of pixels.
And the foreground color can now be blended into smudged pixels, controlled by
a new Flow slider, where 0 means no blending.
All painting tools now have explicit Hardness and Force sliders except for
the MyPaint Brush tool that only has the Hardness slider.
Most importantly, GIMP now supports canvas rotation and flipping to help
illustrators checking proportions and perspective.
A new Brush lock to view option gives you a choice whether you want a brush
locked to a certain zoom level and rotation angle of the canvas. The option is
available for all painting tools that use a brush except for the MyPaint Brush tool.
New Symmetry Painting dockable dialog, enabled on per-image basis, allows to
use all painting tools with various symmetries (mirror, mandala, tiling…).
This new version of GIMP also ships with more new brushes available by default.
Contributors: Michael Natterer, Alexia Death, Daniel Sabo, shark0r, Jehan
Pagès, Ell, Jose Americo Gobbo, Aryeom Han…
Adding colors
First of all: Blur the image a bit using (a value of 5 may be a good start). Now add a new layer to the image with the help of the New Layer button in the layers dialog. Choose it to be white. It will be created above the just made text layer effectively hiding it. It will be active which can be seen from the fact that it has a blue background in the layers dialog. Click some times on the eye symbol to see how you can make a layer invisible and make the other layer active by clicking on its small preview in the layer dialog. At the end, leave the new white layer visible and active. Use the plasma plugin to make this layer a little colorful: (Yes, you are invited to experiment with the parameters…). The layer dialog should look something like this now: